Videos - Register Schedule Builder
Basic Registration Steps
Once you register for courses, you are academically and financially responsible for your courses, whether or not you attend courses. You can drop all you courses prior to the first day of the semester without penalty. Once courses start, there are published deadlines to add, drop, or withdraw from class with varying refund rates and grade options.
- Research what courses are needed for your degree
- To obtain a program sheet detailing degree requirements, click the link below or visit the academic department of your major.
- Meet with your advisor
- If you have not yet declared a major, work with IRIS. If you declared a major and not yet been assigned a faculty advisor, please visit the academic department for your program.
- Plan your schedule with the Register Schedule Builder link. Once you find schedules you like save them as favorites to go back on your registration date.
- Take care of any registration holds.
- Go to the Register Schedule Builder link, sign in, and click continue to build a schedule or access your favorites.
- Register for these classes on your registration date.
- Print your schedule for accuracy
- Pay your bill
Students only away for one semester (excluding summer) will have a hold on their account. To remove the hold, contact the Registrar's Office to provide an up-to-date address and any transfer information. Registration can be done once all holds have been resolved. A returning student application is not required.
Students away for one year or more need to follow the instructions below:
- Fill out the Returning Student Application online.
- Research what courses are needed for your degree
- To obtain a program sheet detailing degree requirements, click the link below or visit the academic department of your major.
- Meet with your advisor
- If you have not yet declared a major, visit IRIS Academic Advising. If you declared a major and not yet been assigned a faculty advisor, please visit the academic department for your program.
- Plan your schedule with the Register Schedule Builder link. Once you find schedules you like save them as favorites to go back on your registration date.
- Take care of any registration holds.
- Go to the Register Schedule Builder link, sign in, and click continue to build a schedule or access your favorites.
- Register for these classes on your registration date.
- Print your schedule for accuracy
- Pay your bill
- Research what courses are needed for your degree.
- Download a program sheet from the online catalog for your intended major.
- Plan your schedule
- View your transfer credits in the DegreeWorks app in MAVzone.
- View the Suggested Course Plan found on the program sheet for your intended major.
- Plan your schedule based off of courses you have not yet completed with the Schedule Builder link. Once you find schedules you like save them as favorites to go back on your registration date.
- Take care of any registration holds.
- Go to the Register Schedule Builder link, sign in, and click continue to build a schedule or access your favorites.
- Register for these classes on your registration date.
- Print your schedule for accuracy
- Pay your bill
If you would like assistance with the registration process, you can schedule a Transfer Student Advising Appointment to meet with one of our IRIS Advisors via phone appointment.
Online registration information
You can register for classes using the Register Schedule Builder webpage.
If you are not already logged in to MAVzone, you will need to click the sign in button in the upper right-hand corner of the screen. Use your MAVzone username and password to continue the registration process.
- Click 'Sign In' in the upper right-hand corner to begin.
- Read the front page, review any resource links you'd like, and then click 'Continue' at the bottom of the page.
- Take note of and address any holds listed. After all holds are addressed you can continue to the next step.
- Select the Registration Term and take note of the starting date of your registration time frame.
- Expand the 'Campuses' section by clicking the word 'select'. Select the campuses you'd like to take classes on as seen below:

- Type in course numbers and subjects (Ex. ENGL 111), titles (Ex. English Composition), or instructors names and click on the course you'd like to add to your schedule.
- Continue searching for courses until you have selected all courses you'd like to take.
- Page through the results and once you have found a schedule you are interested in either save the schedule as a favorite (prior to your registration opening) or register for the courses.
- For information on how to narrow your search results and used advanced search features click on the Narrowing Schedule Results section.
- Once you have found a schedule you would like to save for later scroll to the 'Save as Favorite button' seen below and click the pencil icon next to your favorite to name for easier retrieval later.


- To access these on your registration date find the maroon bar on the right-hand side of your screen that says favorite and click the box to expand section.
- Click on the schedule you want to register for by clicking the maroon arrow. This will populate your schedule to the middle of the screen. Scroll to the bottom of the page and click Continue to Registration to register.
- Once you have found a schedule you would like to register for click the 'Continue to Registration' button seen below

- Your schedule will appear with the action 'Web Registered' next to each course. Click 'Submit Action' to be enrolled in these courses as seen below

- After this is submitted the page will tell you if the registration was successful or if a course was unable to be added due to one of the following reasons: full/missing a prerequisite/ missing a corequisite/ missing instructor permission/ etc. as seen on our Example Error Messages.
Pinning Specific Course Section:
- If you find a course section that you want to take and you wish not to see any other sections you can pin the course as seen below

- This sill eliminate all other sections from appearing in your schedule results.
Advanced Search:
- Click 'Advanced Search' in the 'Select Course' bar to search by essential learning categories. Be sure to select 'Section Level' in the search level section in order to open up the essential learning categories as seen below:

- Click search and all courses fitting this category will appear. Once you've selected the course you are interested in click the check box next to the course, click 'Add Selected Course', and the course will now appear on your schedule
Personal Time:
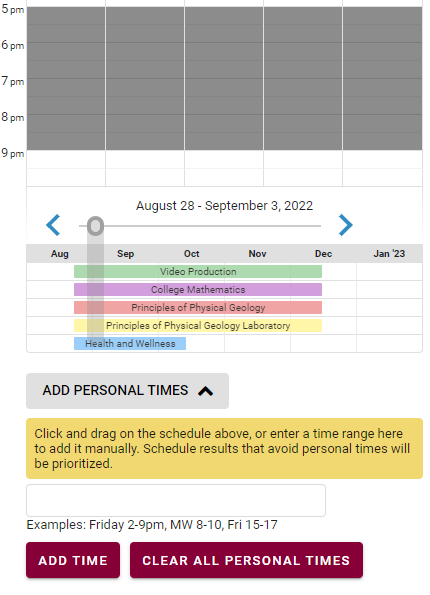
- To add personal time for practices or work time you can click on the calendar to the right and darken times that you would not like to have class.
- You can also click the 'Add Personal Times' button and type in timeframes such at Friday 2-9pm as seen below. Schedules meeting these time constraints will appear in the beginning of your results.

Part of Term:
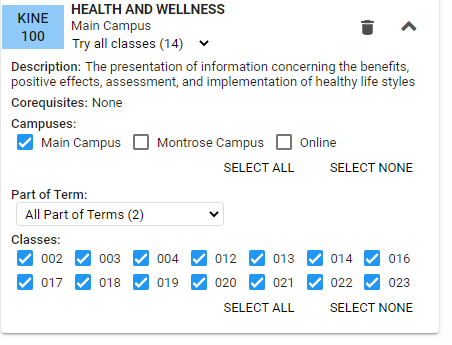
- If you would like to narrow your results for a certain course to only first mod, second mod, online, in person, or if you have a specific section you'd like to register for you can narrow this down by expanding the course as seen below and checking and unchecking boxes.

Instructional Methods:
- If you would like to narrow your results by instructional methods you can expand the 'Instructional Methods' section under the 'Campuses' section as seen below. Simply check or un-check instructional methods you would like to see results for or see no results for.

Course Time Frames:
- If you have time preferences such as courses mostly in the morning, more time on campus, courses mostly on Tuesdays and Thursdays you can search by timeframes.
- To do so expand the sort by section as seen below and select your preference..

Why hasn't the number of results narrowed?
- While the number of results will not always change on the top of your screen, if you click the last result arrow as seen below

- An informational screen will appear explaining what number of the results meet your time preferences as seen below

To Drop a course
- First click the trashcan icon next to the course you would like to drop as seen below

- Next click 'Continue to Registration' at the bottom of the page to begin dropping the course.
- Now your current schedule will appear and next to the course you are dropping you will see the words 'Web Drop Course' in the options column as seen below

- Click 'Submit Action' to drop the course. Now 'Deleted' will appear in the results column and this course has been successfully dropped as seen below.

- Click 'Return to 'Select Courses' to go back to your schedule and the course you dropped will no longer appear.
To Swap a course
- First un-pin the course from your schedule by click the course you'd like to swap. The pin should disappear as seen below

- Next page through until you find the section you are wanting to swap and click 'Continue to Registration'
- The course will appear with the options to web drop your originally registered course and web register for the course you have just selected as seen below

- If you would like to proceed with this action click 'Submit Action'
- Click 'Return to 'Select Courses' to go back to your schedule and the course you dropped will no longer appear but the new section will appear in its place.
Helpful Hints
- When adding a class with a lab, be sure to click both the class and the lab before clicking 'Continue to Registration'.
- Check out the Important Dates page for Add, Drop, and Withdraw Deadlines.
- Contact IRIS for further assistance.
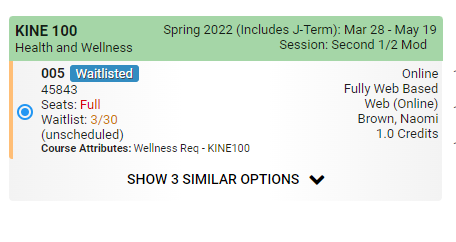
- When registering for classes instead of 'Web Registered' you will see the option of 'Waitlist' as seen below

- If you would like to waitlist for the course click 'Submit Action' and you will be waitlisted for the course as seen below

- Review your schedule to ensure you have been waitlisted for the class.
IMPORTANT: Once waitlisted, it is your responsibility to check your Colorado Mesa University e-mail for notification when the class opens. The system will send you an e-mail within 10 minutes of an opening if you are first on the waitlist. Prior to the first week of class, you will have 72 hours to add the class. The week before classes begin the time limit drops to 48 hours. Once class starts, you will only have 24 hours to add. If you do not take action, you will be removed from the waitlist and the seat will be offered to the next person on the list. There may be occasions when you receive the email, but the class has closed in the interim. This could be due to corrections, administrative processing, a faculty signed add slip, or your time limit expired. In these cases, you will need to re-add yourself to the waitlist or contact the Registrar's Office for options.
During the winter and summer breaks, the Registrar's Office reserves the right to process the waitlist as needed to assist with enrollment. Prior to the first day of class, it is your responsibility to check your schedule to make sure you are enrolled in the courses you desire.
Classes with labs - The Registrar's Office processes all waitlists for classes with labs due to complications when only one of the two classes opens. The open spaces are given to the first person that can successfully register for both the class and lab. The Friday before classes start, the waitlist will be cleared to best ensure open classes fill. To enroll in classes with labs the first week, a student may choose from the open sections.
By adding or waitlisting for a class, you are responsible for payment of any new tuition charges. For detailed payment/billing information contact IRIS.
- Click the ‘Login to Register’ button, click sign in, and select your term.
- Your schedule should now appear.
- Next to the course you received your waitlist notification for, click the trashcan button seen below:

- You should see this message below indicating the course has not yet been dropped:

- Now click ‘Continue to Registration’ seen below

- You should see a screen, like that below, with your waitlisted course and a drop down menu under the options heading. In this drop down menu select ‘web registered’ as seen below and click ‘submit actions.’ This will add the course to your schedule.

- Please be sure to double check your schedule in the ‘Register for Classes’ application in MAVzone to ensure you were successfully added to the course.
It is the student's responsibility to drop or withdraw by the published deadlines on the Important Dates page.
- Drop: Prior to the drop deadline, the course will not appear on the student's transcript. A student's tuition and course fees will be adjusted to reflect the courses remaining in the schedule. Dropping all classes will result in a $225 partial tuition assessment.
- Withdraw: After the drop deadline, a student can withdraw up to half way through the course. A withdraw will be denoted on the transcript with a grade of "W" and will not be used in any GPA calculations. The student is responsible for the full cost of tuition and course fees.
- After the Withdraw Deadline: A grade of F will be assigned and published to the transcript. The student is responsible for the full cost of tuition and course fees.
DROP A CLASS WITH SCHEDULE BUILDER BY THE DROP DEADLINE
- Fist click the trashcan icon next to the course you would like to drop.
- Next click 'Continue to Registration' at the bottom of the page to begin dropping the course.
- Now your current schedule will appear and next to the course you are dropping you will see the words 'Web Drop Course' in the options column.
- Click 'Submit Action' to drop the course. Now 'Deleted' will appear in the results column and this course has been successfully dropped.
- Click 'Return to 'Select Courses' to go back to your schedule and the course you dropped will no longer appear.
If holds or technical barriers exist, please use the Special Drop Course form.
LOOK UP YOUR HOLDS IN SCHEDULE BUILDER
- Click 'Sign In' in the upper right-hand corner to begin.
- Click 'Continue' at the bottom of the page.
- Any holds blocking registration will appear here. All registration blocking holds must be cleared prior to registration.
Online Hold Release Forms
Used to add two sections of the same course, such as two BIOL 396 topics courses. It can only be used on courses that allow multiple instances toward graduation.
Used to adjust the maximum credits allowed for a student in a term. It will be routed to advisors and others for approval as needed.
SPECIAL OVERRIDE EMAIL REQUEST
Creates an email to the instructor(or processing office) for common registration errors such as: instructor permission, prerequisite, corequisite, closed class, class level restriction, and major/department restrictions. Once reviewed, an email with an approve or deny will be sent to the student. If approved, the student will need to log into MAVzone registration to add the course.
Used to add two courses are the same time. The student is responsible for making arrangements with the instructor(s) for attendance and testing.
Used to add courses during the Late Add Period, which is just after classes start to the published add deadline. The student must address registration holds prior to submitting the form. The form will route to the instructor and if approved it would be routed to a registration processor. If declined by the instructor or due to holds, you will receive a response via CMU email.
- From MAVzone, click on the "Register for Classes" application.
- Next click "View Past & Current Schedules"
- Select the current term and then three viewing options will appear
- Look Up a Schedule view - Shows the CRN, course, and section numbers, as well as the title, credit hours, and part of term. To print this view click the print icon in the right hand corner of the screen to print your schedule.
- Schedule view - Shows your schedule in weekly calendar format. Some classes may not appear if they are not offered during the week shown. Adjust the date range if needed.
- Schedule Detail - Shows the same information as the Look Up a Schedule plus more. Such as the dates, times, and meeting room information.
