Information Technology maintains and supports various open and academic labs on campus. Each lab is equipped with computers and high-speed laser printers. Microsoft Office is installed on all computers.
Open Computer Labs Description/Principle Use Hours
Residence Halls - for use by residence hall residents 24/7, when halls are open. Tomlinson Library, 1st, 2nd, 3rd floors - for use by all students, same hours as the Library. The Library 24-hour Study Room, is available 24/7, with MAVcard access after-hours.
- Tomlinson Library 1st floor Tech Map
- Tomlinson Library 2nd floor Tech Map
- Tomlinson Library 3rd floor Tech Map
CMU Tech, B107, for use by all students, when CMU Tech is open.
Montrose 103, for use by all students, when Montrose campus is open.
Academic Computer Labs
Archuleta Engineering Center 114 Construction Management
Archuleta Engineering Center 123 Construction Management/Machining
Archuleta Engineering Center 136 Machining
Confluence Hall 217 Engineering
Confluence Hall 218 Engineering 24-Hour Open Lab
Confluence Hall 276 Computer Science, Mathematics & Statistics
Confluence Hall 305 Engineering
Confluence Hall 315 Engineering
Dominguez Hall 203 Business
Dominguez Hall 204 Business
Dominguez Hall 303 Computer Information Systems
Dominguez Hall 304 Computer Information Systems
Escalante Hall 110 Language, Literature, Mass Communication
Escalante Hall 125 Language, Literature, Mass Communication
Escalante Hall 130 Language, Literature, Mass Communication
Escalante Hall 257 Language, Literature, Mass Communication
Escalante Hall 302 Language, Literature, Mass Communication
Escalante Hall 312 Language, Literature, Mass Communication
Fine Arts 303 Graphic Design
Fine Arts 308 Graphic Design
Fine Arts 312C Graphic Design
Houston Hall 231 Developmental Education
Houston Hall 232 Social & Behavioral Sciences
Maverick Center 153 Health Sciences
Montrose 203 Health Sciences
Montrose 205 Health Sciences
Montrose 207 Various
Moss Performing Arts Center 125 Music Tech Lab
Moss Performing Arts Center 166 Theater Design Studio
Tomlinson Library 305 Writing Center
CMU Tech B126 Computer Aided Design
CMU Tech B142 Office Administration
CMU Tech B161 Visual Communications/Digital Design
CMU Tech B165 Visual Communications/Digital Design
CMU Tech B188 Technology Integration
CMU Tech B197 Various
CMU Tech BC104 Medical Office Assistant
Wubben Hall & Science Center 118 Computer Science, Mathematics & Statistics
Wubben Hall & Science Center 120 Computer Science, Mathematics & Statistics
Wubben Hall & Science Center 147 Geographical Information Systems
Wubben Hall & Science Center 205 Computer Science, Mathematics & Statistics
Wubben Hall & Science Center 214 Physical and Environmental Sciences
Wubben Hall & Science Center 245 Physical and Environmental Sciences
Wubben Hall & Science Center 256 Biological Sciences
Wubben Hall & Science Center 356 Physical and Environmental Sciences
Computer labs are intended solely for academic use by all students. To maintain an environment that complements that use, please comply with the following when using these spaces.
- Computer lab equipment is to be used for academic use only.
- Computer lab equipment is for use by students, faculty, and staff only.
- Save your work in your One Drive folder. Do not save your work on the local computer.
- Game playing is prohibited.
- Obscene language on the computer system is prohibited. Any obscene language found on the system will be deleted immediately. Files with obscene names will be deleted.
- Be considerate to Lab Assistants/Help Desk Staff where present. Lab Assistants/Help Desk Staff help remedy problems related to the general operation of the lab. Please do not expect them to solve your homework problems or tutor you.
- Report any computer system irregularities, problems, or suspicious activity to the Lab Assistant, or the Help Desk (970-248-2111).
- Set your cell phone to ring silently, and exit the lab before speaking on the phone. The CMU Library offers cell phone rooms on the 2nd floor, LIB203, and on the 3rd floor, LIB302. Please use these when making/receiving cell phone calls in the Library.
Click the link below to access the CMU Software Lookup tool to find where software titles are installed:
Brightspace, commonly referred to as just “D2L,” is the learning management system used at Colorado Mesa University. CMU uses Brightspace for all online, hybrid, and face-to-face courses. This system allows students and instructors to engage in online classroom activities.
Click D2L Student Resources for more information about D2L.
Service Desk is CMU's new tool for requesting either Facilities or Technology help with issues and requests for new services from either department. Service Desk is an intuitive, mobile-friendly platform powered by Halo that makes getting help faster and easier for everyone — students, faculty and staff.
To access the Service Desk, simply log in to MAVzone, and locate the Service Desk application icon. Click Service Desk to login to the Service Desk portal page.
Built-in to Service Desk is a comprehensive knowledge base that can help locate answers to many of your potential issues or requests. If you cannot locate your answer, use the various tiles to submit either an incident request for something that's not working, or a service request for a services that you need fulfilled.
Network Storage - OneDrive
All of the work you create at CMU can be saved to your personal OneDrive folder. Your OneDrive folder is cloud storage available to you from any Internet connected device through MAVzone. Never store your work on campus computers, always store your work on your OneDrive folder.
The Courses Directory (K: Drive)
Some faculty members may request that you electronically turn in assignments by saving them to the Courses Directory. The Courses Directory has folders named by course and section. If you are enrolled in CSCI-100 Section 3, for example, you will find a K:\CSCI100\003\Students\yourusername folder, when logged onto a CMU computer. Course folders are deleted at the end of each semester. Do not use the Courses Directory for permanent file storage.Each floor of the library has a high tech scanning system known as Knowledge Imaging Center, KIC for short. These are walk up systems that produce extremely high resolution scans of any printed material from books, magazines and journals. Using a "two up" process, any two pages of a book can be scanned into a single image. The image is then analyzed and two separate images, one for each page, are created in about 5 seconds. The system will automatically remove black edges and straighten up content before creating the output file(s). Output of the images can be saved to a jump drive, emailed, or saved to your mobile device. The system can output files in several different formats including JPG, PNG, TIFF, or searchable PDF.
Click the links below to find the location of the KIC Scanners.
In 2009, the Associated Student Government approved the purchase and implementation of print management software to reduce the University's printing waste. This software encourages conservation in printing by requiring a second step of releasing the job to the selected printer, and through charging for jobs which have been released. This Fall 2024, a new print management solution is being launched, called PaperCut (code name - MAVprint).
How does MAVprint work?
- Each student will receive a quota of "free prints" each semester equivalent to $10.00 worth of printing.
- Remaining balances in the quota account at the end of each semester will not be rolled forward.
- The following rates have been established:
Single-sided, black & white - $.05/sheet of paper
Double-sided, black & white - $.08/sheet of paper
Color - $.25/sheet of paper - Students will have two "printing purses". The first purse is the free purse that is credited at the beginning of each semester.
- The second purse contains funds that you can add to the your MAVcard for additional printing. Visit the MAVcard office to add MAVprint money to your MAVcard. You must add to the FLEXMONEY account for printing.
- MAVprint will automatically use your "free" purse. Once that has been exhausted, your subsequent prints will debit your FLEX account.
- Optionally, you can add money for printing using the MAVCARD app. Log in to MAVzone, click Applications in the Navigation Bar, then click the MAVCARD app. Your browser will load the Heartland Payment Systems window. Click the ADD CASH tab. Be sure to select the FLEXMONEY account and fill out the rest of the form. Click Continue, then answer and confirm the remaining prompts.
- Students will not be charged for printing in "closed" labs. A portion of their course fee is used to purchase printing supplies in these cases. However MAVprint will track print usage in all labs.
- High school students will not be charged for printing.
Printing from Campus Lab Computers
Campus lab computers will already have the correct printer(s) installed based on the location of the computer.
- From within the application you are using, initiate a File, Print command. The print job will be sent and placed on hold by MAVprint.
- The MAVprint screen will pop-up on your screen.
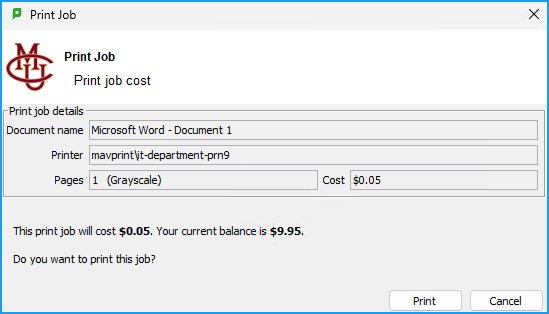
- To print, just click Print. This dialog will also tell you the cost of the print job and your current balance will be shown. This is a combination of your semester free printing quota of $10, plus any money you place into your FLEXMONEY account. The free money will always be used first, and then when exhausted, the charge will come from your FLEX account.
Installing Printers to Personal Devices
Mobility Print
Mobility Print is a client software that you can download to your personal device and send print jobs to campus printers. This is a good solution for printing many jobs over time to specific computer lab printers.
- Click Mobility Print and follow the on screen directions.
- For iOS devices, nothing actually installs, you are just presented with instructions on how to print.
- Windows devices will install a client and prompt you to select which printer(s) you want to add, along with your CMU login credentials. Once the installer finishes, you just print to the selected printer as you would normally.
- For Android devices, follow the on-screen instructions.
- After you have installed the client, you can print to the printers that you chose. The jobs will be sent, but MAVprint will hold onto the jobs and you will have to release them.
- One way to release the job is to access your CMU email via the Outlook app in MAVzone, locate the email notification of the print job, and click the link in the email. This will take you to MAVprint, and shows you the Job Pending Release option. Notice on the far right-hand side of the job listing, there is a Print link. Click this to print the job.
- Alternately, in MAVzone, run the MAVprint app and access the Jobs Pending Release option. Use the Print link to release the job.
WebPrint
For occasional prints, WebPrint is a simple and easy way to print an existing file.
- Login to MAVzone, and run the MAVprint app. This will bring you to the MAVprint Login screen.
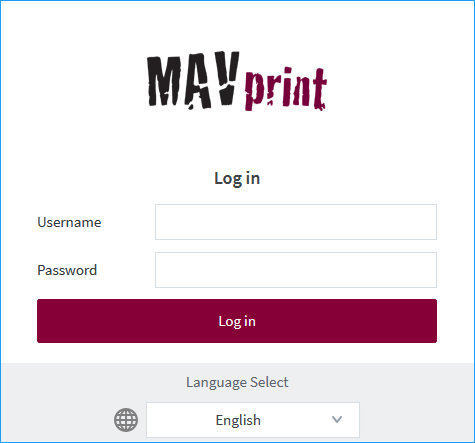
- Enter your CMU credentials and click Log in. The MAVprint window will appear.
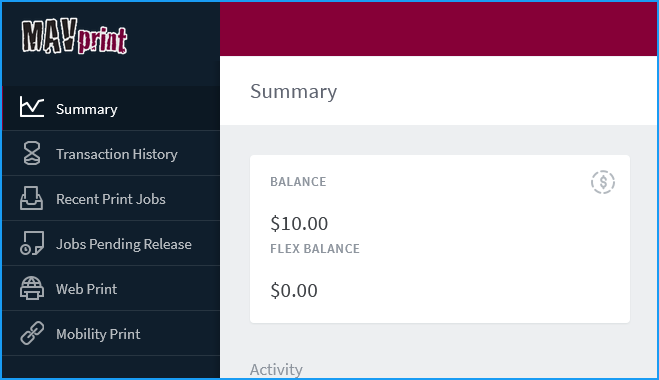
- To print, click Web Print.
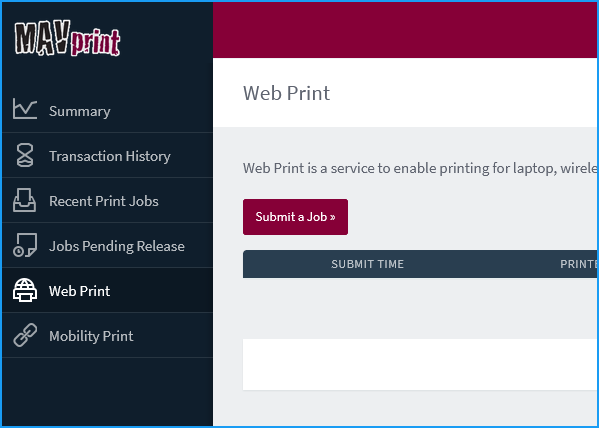
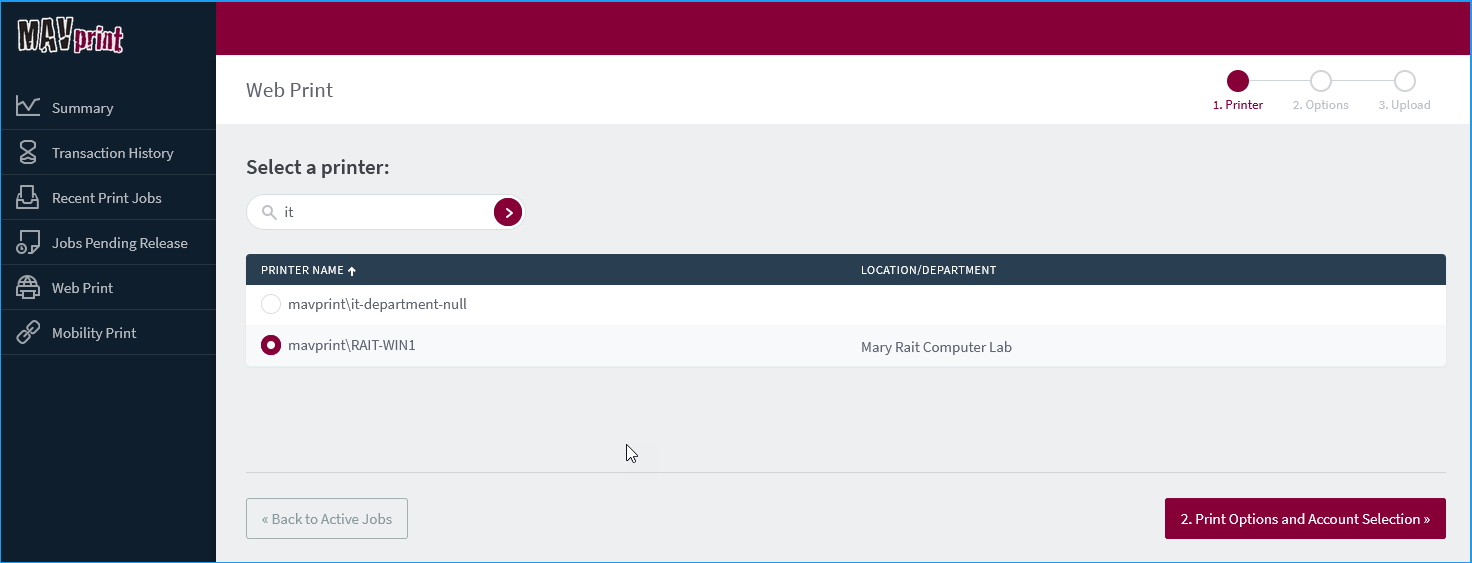
- Click Submit a Job. Next, select a printer from the list, and then click Print Options and Account Selection.
- The next screen will prompt you to upload your file. Click Upload Documents.
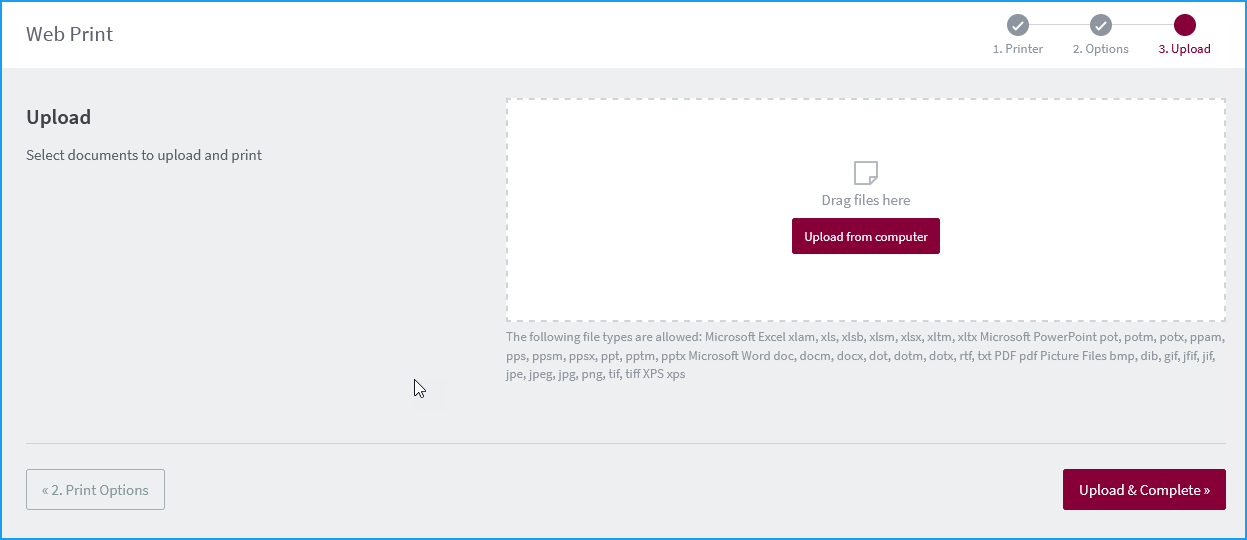
- After you've dragged the file(s) into the window that you wish to print, click Upload and Complete. The print job will take a small amount of time to render and will be submitted to the printer.

- In the Navigation bar, click Jobs Pending Release. Locate the job you want to print and click the Print link.
Paper Saving Tips
- Print only the pages that you need in a document. Don't print drafts for every revision. Only print after thoroughly doing an on-screen proofread.
- When printing Power Point slides, print them six (6) to a page, black & white only, with no background.
- Use the "Print Preview" feature to check your document before printing.
- Avoid printing email messages and web pages.
- Send electronic documents instead of printing hard copies.
- Use the spell check feature to find spelling and grammatical errors.
- Print only one copy.
- Use the duplex function to print on both sides of a sheet of paper.
- Check margins, printer, and page settings prior to printing.
- Use the "print-friendly" option when printing Web pages if available.
All campus computers come installed with the full Microsoft Office suite of software. However, now our licensing provides Microsoft 365. This provides web-based versions of Word, Excel, PowerPoint, Outlook, OneDrive, OneNote, and Teams. Microsoft 365 also provides you with cloud storage through OneDrive. This storage is integrated with the traditional software based versions of Office and the new web-based Microsoft 365 applications.
Microsoft 365 also permits you to download/install the most current version of Microsoft Office. This includes Word, Excel, PowerPoint, Access, Publisher, Outlook, OneDrive, OneNote and Teams. Have an Apple computer with OS X? Microsoft 365 permits you to download and install the latest version of the Microsoft Office suite for Mac. This includes Word, Excel, PowerPoint, Outlook, OneDrive, OneNote, and Teams. You can also install many of the Microsoft apps to tablets and smartphones.
Accessing Microsoft 365 Applications
- Log in to MAVzone.
- Select Applications in the Navigation Bar.
- From the applications list, launch OneDrive.
- Along the top of the browser page, find and click the NEW drop-down menu.
- Choose the type of file you want to create and click on that choice in the menu.
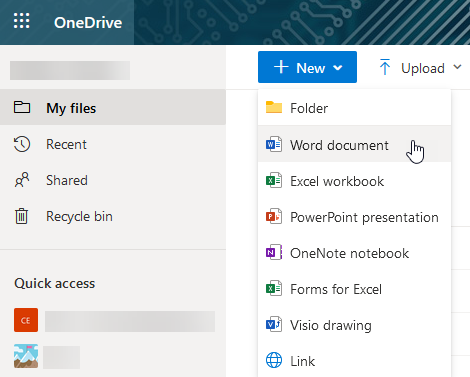
- A new file will be created. Your page will show the web-based version of that application with your new document ready for editing. As you work, the file will be automatically saved.
- Alternately, the Applications list also offers direct access to Word, Excel, PowerPoint, Outlook, and Teams.
Installing Microsoft 365 Apps on Personal Devices
Microsoft 365 permits you to install Microsoft 365 Apps on up to 5 personal devices.
- Log in to MAVzone.
- Select Applications in the Navigation Bar.
- From the applications list, launch Microsoft 365. This will bring you to the M365 Copilot screen.
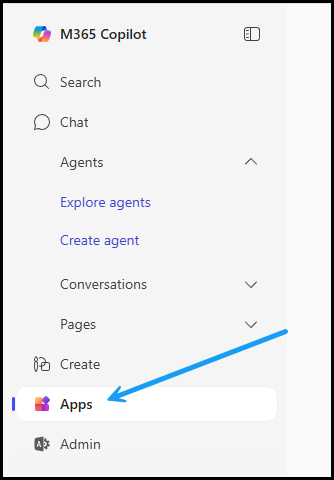
- Look to the far left of the page, and in the navigation bar click on Apps.
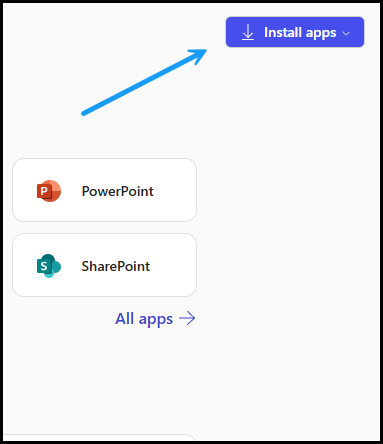
- Next, look to the far right-hand corner of the page, and click Install apps.
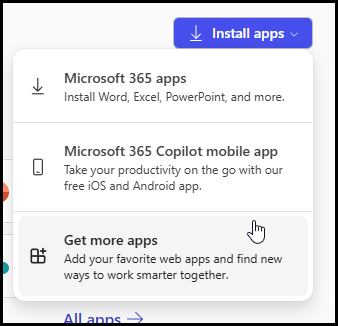
- Next, click on the Install apps button to and in the drop-down menu, click Microsoft 365 apps.
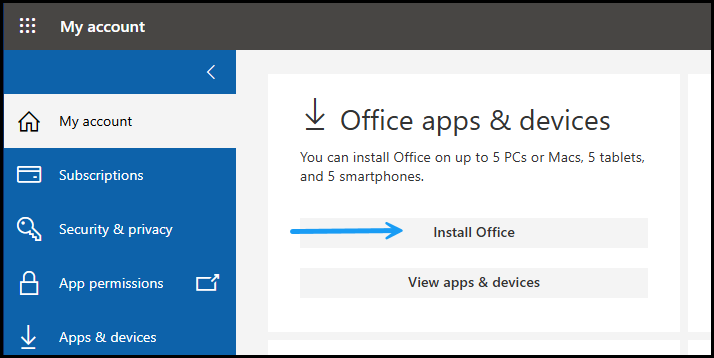
- At the next screen, click Install Office.
- A file will download. Once the download is complete, open the file, and follow the prompts. Overall the download and installation will take some time.
Microsoft 365 Training Resources
Below are some very useful links to help you get the most out of Microsoft 365.
Residence Halls are equipped with Ethernet jacks, wireless connectivity and cable TV. Links below provide instructions on connecting your personal technology to these services in your residence halls.
What is Needed?
- You will need your MAVzone username and password in order to register your device.
- You will need an Ethernet cable if you wish to connect your device to the Ethernet port in your room. Ethernet patch cables can be purchased at office supply stores, electronics stores, or the CMU bookstore.
Ethernet Access
For assistance in connecting devices to the Ethernet port, reference Connecting to the CMU Ethernet (Students) in this link. Get Connected
WiFi Access
For assistance in connecting your wireless devices, reference Connect to CMU WiFi (Faculty, Staff, Students) in this link. Get Connected
Streaming Media & Game Consoles
For assistance in obtaining the WiFi or Ethernet address of a device needing network access, click the following link. Locating a Device Hardware Address
For assistance in connecting your device to the WiFi, reference Connecting Consumer WiFi Devices in the following link. Get Connected
For assistance in connecting your device to the Ethernet, reference Connecting to the CMU Ethernet (Students) in the following link. Get Connected
Getting Help
Students needing assistance with connectivity issues should use Service Desk to search the Help Articles knowledgebase or to submit a service request.
- Login to MAVzone.
- Launch the Service Desk application.
- Click the Technology tile.
- Click the Get Connected tile.
- Click the for Connecting to a Network tile.
- Follow the directions on this page.

Panopto is a lecture capture tool used at CMU. It can also be used by students to record content as required for class use. The software is available for use in campus classrooms and computer labs. Classroom/Lab instructor PCs all have webcams installed. With Panopto, you can record your screen and audio, as well as video from a webcam. All recordings are automatically uploaded to our Panopto server and integrated with D2L, for a given class. Panopto is also available in Library Group Rooms.
The software is free to be installed on any personal PC, laptop, or mobile device for faculty/staff and students. Students can record their own video for a given class after their professor enables an assignment folder for the class. Without this step done, students can only view videos when logged onto Panopto.
For additional information check out the numerous video tutorials offered by Panopto, Panopto Video Tutorials.
