Every semester, midpoint, department heads will be prompted to submit new/updated/deleted software requests for the upcoming semester. Be sure to convey your requests to your department head in time to prepare for the upcoming semester. Click the link below to access the CMU Software Lookup tool to find where software titles are installed:
You can create a personal web page available for anyone on the Internet to view. Your F:\ drive contains a folder named public_html. Create html pages containing information for your personal web site and copy them to that folder. The URL for your personal web site will be http://www.coloradomesa.edu/~yourloginname. Information you publish is available for viewing by anyone on the Internet. If you don't have public_html folder, submit a Service Desk ticket requesting creation of this folder.
- In MAVzone, launch the application, Service Desk.
- Choose Technology.
- Choose Request Something New.
- Choose Accounts and Permissions.
- Choose Network File Share.
- Then click Submit a Ticket to fill out the ticket form requesting a public_html folder be created in your F: drive.
Colorado Mesa University's online learning management system is Desire 2 Learn (D2L). You can upload files to D2L for students to access from any computer. You can also maintain an online roster and gradebook through this system, and many other features. The online environment for your course is called a "course shell." Course shells are created automatically each semester for all classes. Click D2L Faculty Resources for a wealth of information about D2L. Questions regarding D2L should be directed to Center for Digital Learning & Innovation.
Faculty can email students by one of three methods discussed below.
MAVzone
-
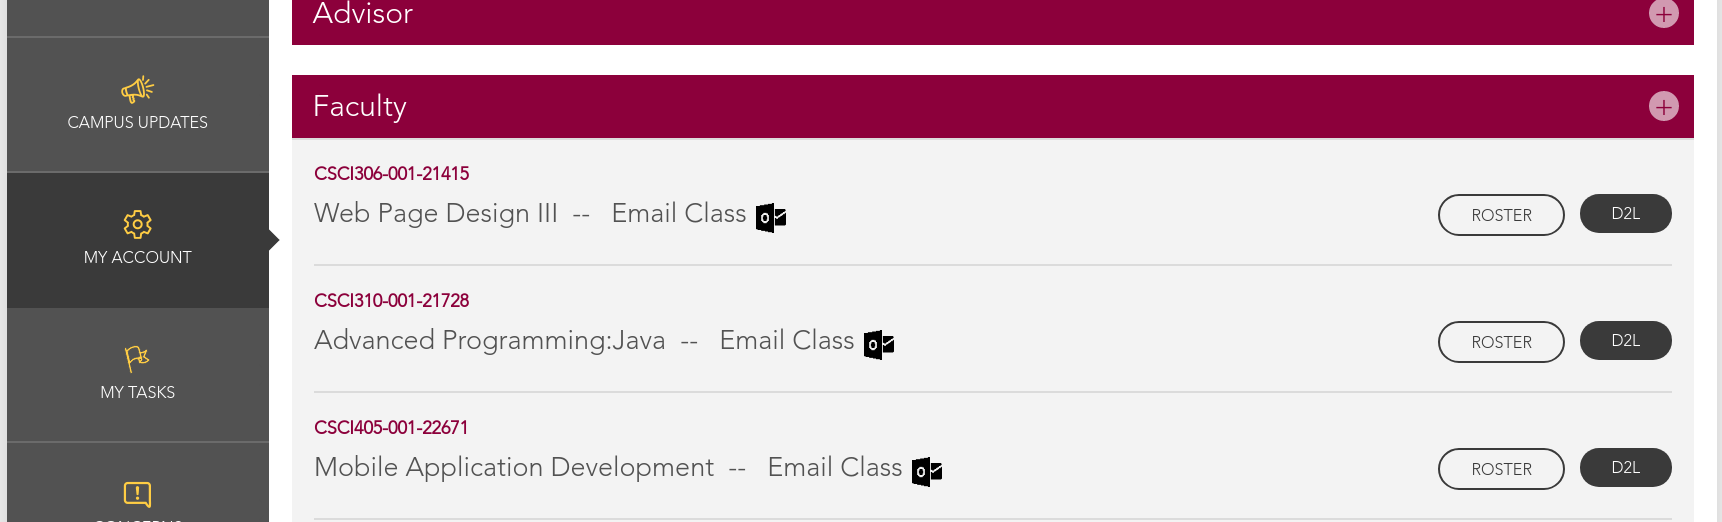
Log into MAVzone. In the Navigation Bar located on the left side of the page, click MY ACCOUNT.
-
When your account info appears, click FACULTY. A list of your current courses will appear. Each course has an Email Class link.
-
Click the link for the class you want to email and a new message window in Outlook will open. The To: field will populate with a distribution list for the class, [email protected]. NOTE: Outlook must be installed on your computer and working with your CMU email in order for this to work.
- If you want to email a particular student, click the Roster button. The class roster in Banner Self-Services will show. Use the email link to send mail to an individual.
D2L
-
Launch D2L and open the class you want to email.
-
Click Classlist from the navigation bar.
-
The Classlist page will appear. If you want to email the entire class, click the button at the top of this page labeled, Email Classlist.
-
A new page will appear, Email Classlist. All the students will be listed and at the bottom of the list click the Send Email button.
-
A new window will appear, Compose New Message. All the student addresses will populate into the BCC: field. This is done so that when a student does a Reply to All, it only goes to you. Enter your Subject and Message text and click the Send button.
-
To email select students, after the Email Classlist page appears, click the checkbox for each select student(s). Then just above the first name in the list, click the Email button. The Compose New Message window will appear and only the names you selected will appear in the BCC: field.
-
Finish the message and click the Send button.
-
To check your Sent mail from D2L, click the envelope button at the top of your screen. Then click Email. This will bring up a Compose New Message window. To the right look for the Sent Mail button. Click Sent Mail to see all messages you’ve sent from D2L.
All messages you send from D2L will show up in the student’s Outlook inbox. D2L does not show the messages received or alert you to an incoming email. This is all handled in Outlook. However, messages you send from D2L will not appear in your Outlook Sent Items folder. They can only be viewed in D2L.
Outlook
Class names are created automatically each semester in Outlook as distribution lists. The class names are formatted using COURSE-SECTION-CRN, i.e., ENGL111-001-12345. These lists are available when using Outlook or Outlook Web App (OWA).
-
Open a New Email window.
-
In the TO: field, simply enter part of the class name.
-
Then click on the Check Names button in the middle of the ribbon bar, on the Message tab. A small list of those names that contain what you’ve typed will appear. Locate the correct one and double-click to populate the name into the TO: field.
-
Be certain you have the correct COURSE name, and SECTION, and especially the right CRN. There are times during the year where the address book has courses listed for more than one term.
-
Enter your Subject and Message text and send. Students will be blind copied (BCC:). Anyone doing a Reply All, will only email the person who sent the original message, not to the entire class.
-
Once you've emailed your class once, the address is stored in the auto-complete list. It automatically populates in the TO: field when you start typing the name again. Remove from the auto-complete list by clicking on the 'X' that appears to the right of the name.
All enrolled students have Colorado Mesa email accounts. Please remind your students that CMU uses their CMU-provided email account for official communication. They are responsible to monitor it regularly and use it to communicate to CMU faculty/staff. Although some students will set up forwarding, this is problematic, both for students and faculty. It is just better for students to use their CMU email account natively by accessing Outlook Email (OWA) from MAVzone.
Please do not include attachments to your email. Use D2L or the Courses Directory (K:) to make files available to students.
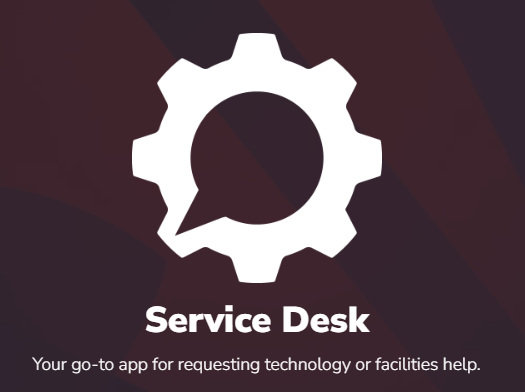
Service Desk is CMU's new tool for requesting either Facilities or Technology help with issues and requests for new services from either department. Service Desk is an intuitive, mobile-friendly platform powered by Halo that makes getting help faster and easier for everyone — students, faculty and staff.
To access the Service Desk, simply log in to MAVzone, and locate the Service Desk application icon. Click Service Desk to login to the Service Desk portal page.
Built-in to Service Desk is a comprehensive knowledge base that can help locate answers to many of your potential issues or requests. If you cannot locate your answer, use the various tiles to submit either an incident request for something that's not working, or a service request for a services that you need fulfilled.
Network Storage
All CMU faculty and staff have access to OneDrive for personal storage, as well as CMU hosted network drives. Always save your work to OneDrive or a network drive; never save to your local hard drive. Only your OneDrive folder and network drives are backed up. When off campus, use the OneDrive app to access files stored there. The MY FILES app gives you access to network drives, if needed. Both apps are available through MAVzone. A detailed description of the different drives appears below.
OneDrive
OneDrive is a secure, cloud storage platform to save and access files and provides remote access from any Internet device. Any work you do at CMU should be saved to your OneDrive folder.
OneDrive offers the ability to share files with other users, significant storage capacity, and you can create Word, Excel, and PowerPoint files directly from a web browser.
The Courses Folder (K: Drive)
Faculty can ask students to submit assignments electronically (D2L) or by saving them to the Courses folder. Each class can have a Courses folder. These folders are not automatically created, you must create them, following the steps below.
- Log in into MAVzone.
- Select Applications from the Navigation Bar.
- Find and click the application MAVnet Self-Service. The CMU Network Self Service page will appear.
- In the navigation bar on this page, click Course Folders.
- A list of your courses will appear. For those you want course folders, select the check box in the Course Folder column. When finished, click the Add Folders button. The folders will then be created within approximately 30 minutes.
Course folders are named by course, section, and CRN. For example, if you request a folder for CSCI-100 Section 3, a folder, K:\CSCI100\003-41234\ will be created. Students will see a K:\CSCI100\003-41324\Students\studentusername folder to which they can submit assignments. Each student can only see their own folder, but you can see all of your students folders. There is also a Share folder for you to place files you want to share with students. This folder is read only. Students can copy from this folder into their own folder in order to make changes. Never use for permanent file storage. Course folders are deleted at the end of each semester.
The Share Folder (R: Drive)
The Share folder is typically used by employees of Departments to share files. New folders in the Share folder must be requested by calling the IT Help Desk at 970.248.2111. Access to Share folders is controlled by network security. When employees are leaving the University, they should save their personal files to the Share folder for future access.The first and second floors of the library have a high tech scanning system known as Knowledge Imaging Center, KIC for short. These are walk up systems that produce extremely high resolution scans of any printed material from books, magazines and journals. Using a "two up" process, any two pages of a book can be scanned into a single image. The image is then analyzed and two separate images, one for each page, are created in about 5 seconds. The system will automatically remove black edges and straighten up content before creating the output file(s). Output of the images can be saved to a jump drive, emailed, or saved to your mobile device. The system can output files in several different formats including JPG, PNG, TIFF, or searchable PDF.
Below are floor maps showing the KIC scanners and other technology devices throughout the library. Open use computers are located on all three floors of the Library but are not indicated on the maps.

Panopto is a lecture capture tool used at CMU. It can also be used by students to record content as required for class use. The software is available for use in campus classrooms. Classroom/Lab instructor PCs all have webcams installed. Panopto can also be installed on any PC, laptop, or mobile device. With Panopto, you can record your screen and audio, as well as video from a webcam. All recordings are automatically uploaded to our Panopto server and integrated with D2L, where they are shared with your students.
Faculty/staff can create videos on their office computers with a webcam. All newer computer systems have a built-in webcam. If you need to purchase an approved webcam for use with Panopto, follows the steps below:
- Log in to MAVzone.
- Launch the Service Desk application.
- Click the Technology tile.
- Click the Request Something New tile.
- click the Computers, Tablets, Printers, Peripherals tile.
- Click the Purchase Hardware tile.
- Click the Request this Service icon and fill out the form indicating that you need to purchase a webcam for your office computer.
- Once this ticket is processed, you'll receive information on a specific webcam to purchase via our electronic ordering system.
For additional information check out the numerous video tutorials offered by Panopto, Panopto Video Tutorials.
All campus computers come installed with the full suite of Microsoft office applications. What was formerly known as Office 365 has been re-branded as Microsoft 365. This provides both software-based and web-based versions of Word, Excel, PowerPoint, Outlook, OneDrive, OneNote, and Teams. Microsoft 365 also provides you with cloud storage through OneDrive. This storage is integrated with both the traditional software-based and the new web-based versions of Microsoft 365 applications.
Accessing Microsoft 365 Applications
- Log in to MAVzone.
- Select Applications in the Navigation Bar.
- From the applications list, launch OneDrive.
- Along the top of the browser page, find and click the NEW drop-down menu.
- Choose the type of file you want to create and click on that choice in the menu.
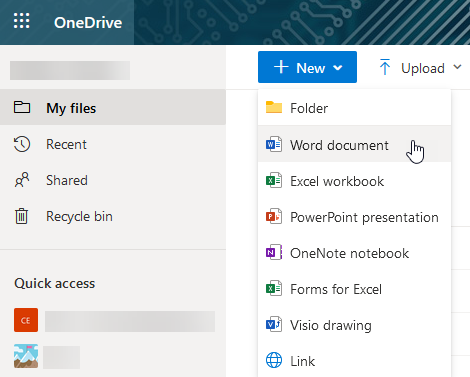
- A new file will be created. Your page will change showing the web-based version of that application with your new document ready for editing. As you work, the file will be automatically saved.
- Alternately, the Applications list also offers direct access to Word, Excel, PowerPoint, Outlook, and Teams.
Microsoft 365 Training Resources
Below are some very useful links to help you get the most out of Microsoft 365.
Enabling/Disabling Focused Inbox
- Launch Outlook and select the Inbox folder.
- At the top of the message list, notice the tabs labeled Focused and Other. These indicate you are in the Focused Inbox mode.
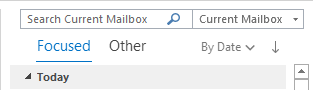
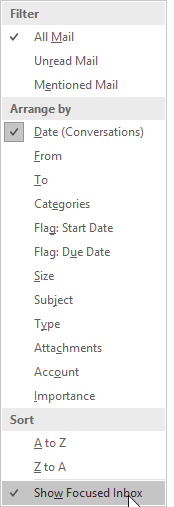
- To disable, notice the Arrange By option to the right of Other. The default setting for Arrange By is By Date.
- Click on By Date, or your current Arrange By option. Then in the menu which appears, click the Show Focused Inbox option to disable this feature.
Enabling/Disabling Focused Inbox (Outlook Web Access)
- Once you are logged on to Outlook Web Access, look at top, right-hand corner of the page. There are several icons in this location.
- Click on the icon that looks like a gear. This is the Settings icon.

- The Settings pane will appear on the right-hand side of the page.
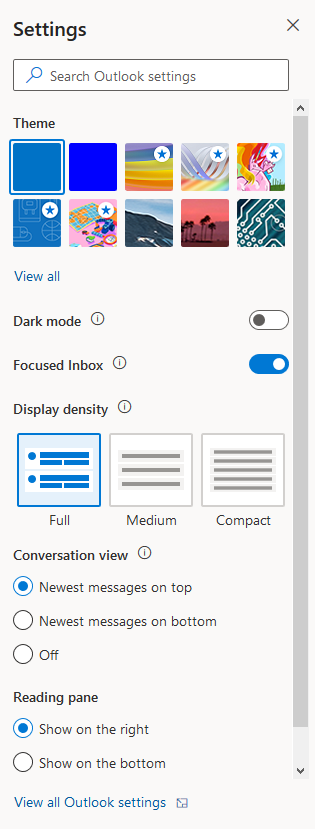
- Look for the Focused Inbox option. To disable the Focused Inbox, click the slider switch to the Off position. The Focused and Other tabs will disappear and the only tab you will see will be Inbox.
Chatting with Teams
- In the title bar of the Teams window, click the New Chat button to begin a chat with someone. The Chat window will take focus. Begin typing the person’s name you want to chat with. The name list will begin searching for the user based on the characters typed. Try typing their last name first. If the list is very long, you’ll be able to scroll through the list.
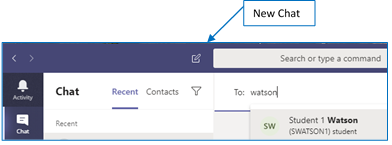
- Select the desired name, then press Tab to place your cursor into the ‘Type a new message’ box. Type your message and press Enter or click the Send button.

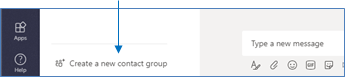
Adding Contacts & Contact Groups
For people you anticipate contacting frequently you may want to add them to your Contacts list in Teams. You can also create Groups to organize your various contacts, perhaps by department for example.
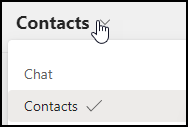
- In the Chat window, click the Contacts tab.
- To the right of Favorites, click the ellipsis button. Next, click Add a contact to this group.

- This will add the contact to the Favorites group shown in the Contacts list.
- To create your own group, click the Create a new contact group at the bottom of the Chat window. Then use the ellipsis tool next to your custom group to add contacts.
- When you click Add a contact to this group, the following dialog box will appear:
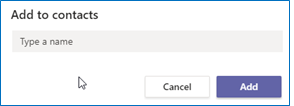
- Begin typing the contact’s last name and the same search function will engage as when starting a new Chat. Once you’ve selected the name, click the Add button to add it to your custom group or the Favorites group.
Changing Your Profile Picture
Upload a photo of yourself for your profile picture. This will show up in Teams, Outlook and any other Microsoft 365 application that shows the profile photo circle.
- Log in to MAVzone and click the Outlook Email (OWA) app icon.
- When Outlook appears, look to the top right‑hand corner and click on the Profile Photo circle.
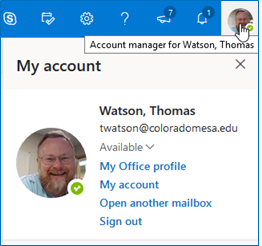
- Next, click directly on your photo in the drop‑down menu.
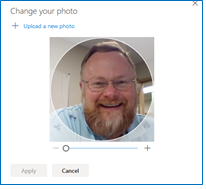
- Click on + Upload a new photo. Select your photo, click Open, then click Apply.
Additional Teams Training Resources
Microsoft Teams Training VideosChanging Teams AutoStart Option
It is highly recommended to leave Teams in 'auto-start' mode. This makes it possible for people to contact you without you having to remember to launch the application. Leaving the app run all the time will have minimal impact on your machine's performance. If you prefer to stop the application from auto-loading, follow the steps below.
- When Teams launches, look to the far right-hand corner of the title bar. Your Profile Photo circle will either contain your initials or your uploaded photo.
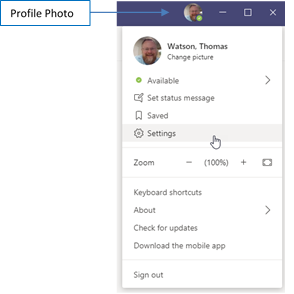
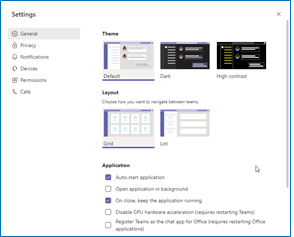
- Click on this icon and in the menu that appears, click Settings.
- In the next dialog box, you can turn off the Auto-start application option. Later to use Teams, you'll need to launch from the Start menu. Just close the dialog box to save any changes.
Teams can send and receive phone calls, store and playback voicemail, and offers many other features found with traditional telephones. Known as a softphone, CMU is performing a department by department migration from traditional desk phones to softphones using Teams. Your department will be notified in advance of the migration. The content below will help you to learn the features of the new softphone.
Important Terms
Secondary Ringer: By default, an incoming call will ring your default audio device. If you have a headset plugged into your computer it will ring the headset but not the computer speakers. Unless you are wearing your headset, you may not hear the ringer. Adding a secondary ringer will permit incoming calls to ring both the headset and the computer speakers.
Transfer: Transfers a call from your line to another line.
Consult Then Transfer: Allows you to speak with the person to whom you are transferring the call, prior to transferring.
Dial Plans
The default CMU dial plan provides faculty/staff local and domestic long distance calls without a long distance code. International calling is disabled by default. If you need to make an international call, please submit a Help Desk ticket. Indicate the date and approximate time you will need access to international calling.
Internal Calling: Dial the four digit extension of the person you wish to call. When you dial the four digit extension, the entire ten digit number will populate. This is normal.
External Calling: Dial the seven digit number (for local calls) or the ten digit number (for domestic long distance calls).
Placing an Internal Call
- In the App Bar, on the far left side of the Teams window, click the Calls view icon.
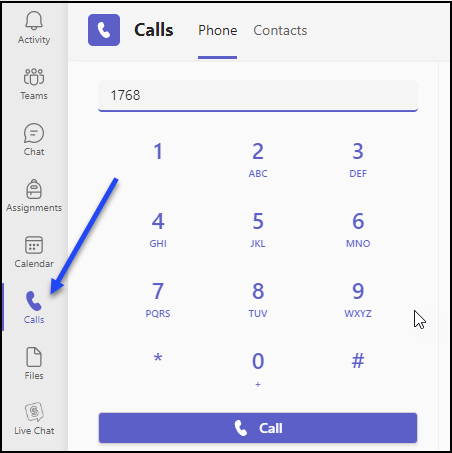
- This changes the view of your Teams window, providing features to support calling. Enter the 4-digit extension of the campus line you want to call. You can click on the numbers shown on the keypad, or type using your keyboard. Then to place the call, click the Call button below the keypad.
Placing an External Call
- In the App Bar, on the far left side of the Teams window, click the Calls view icon.
- For a local external call, enter the 7 digit phone number and click the Call button below the keypad. Domestic long distance numbers need to be entered as a 10 digit number.
Setting Secondary Ringer
- In the title bar of the Teams window, click the Settings and more ellipsis (three dots).
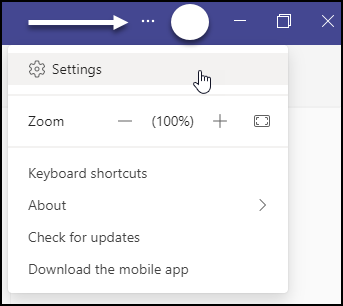
- Next, click Settings. The Settings dialog box will appear.
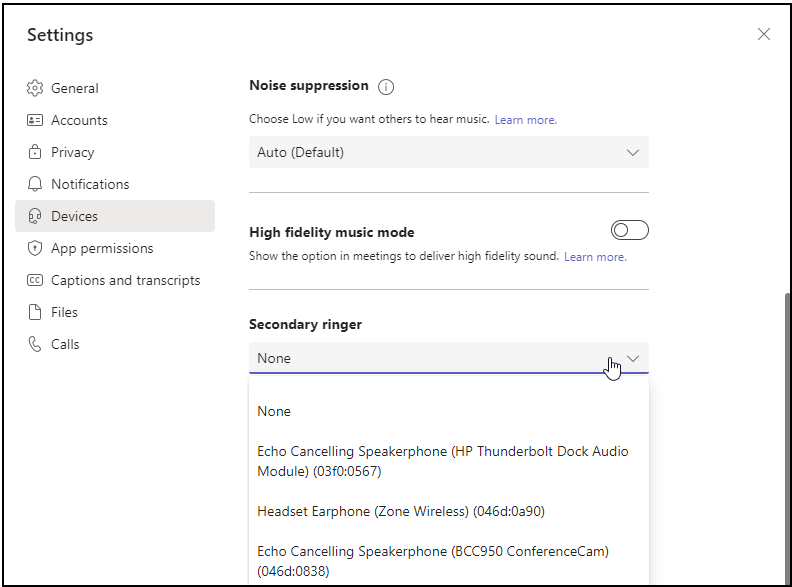
- Click Devices. Scroll the window down until you see the Secondary ringer option. Click this drop-down list and then select the audio output device to use as the secondary ringer.
- Click the Close button to close and save this setting.
Setting Up Voicemail
- In the title bar of the window, click the Settings and more ellipsis (three dots).
- Next, click Settings. The Settings dialog box will appear. Click Calls.
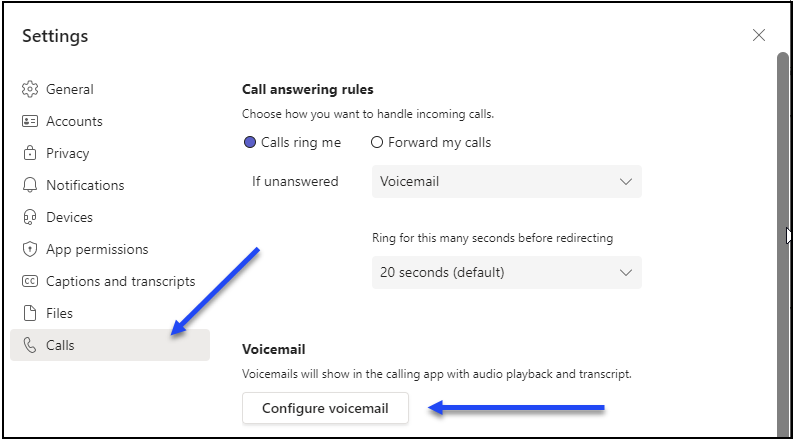
- Next, click Configure voicemail.
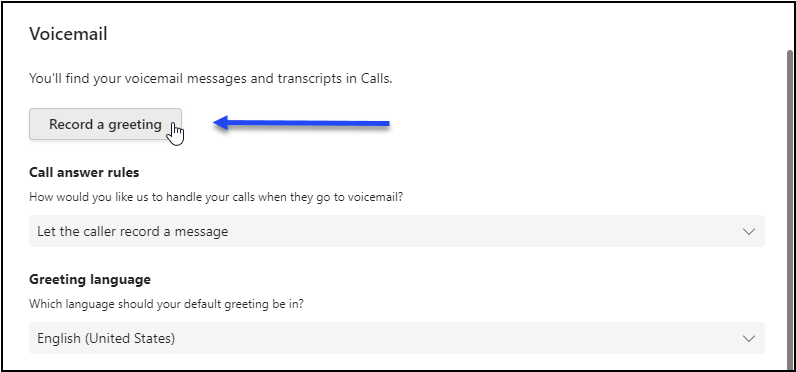
- The Voicemail dialog box will now appear. Click Record a greeting. Teams will then call the voicemail system and present the phone keypad on screen. Follow the audio prompts, using the keypad to make your selections and record your greeting.
Call Forwarding
- In the title bar of the window, click the Settings and more ellipsis (three dots).
- Next, click Settings. The Settings dialog box will appear. Click Calls.
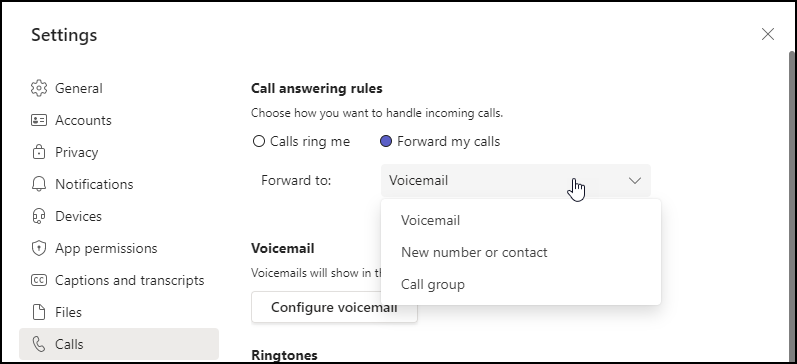
- In the Call answering rules section, choose Forward my calls option.
- In the Forward to drop-down list, choose from the options presented. When finished, close the dialog box.
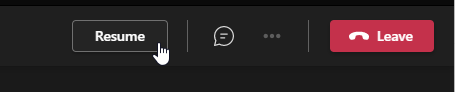
Placing a Call on Hold
- While in the call, look at the toolbar at the top of the Call window. Click the Settings and more ellipsis (three dots) and in the drop-down menu, click the Hold button.
|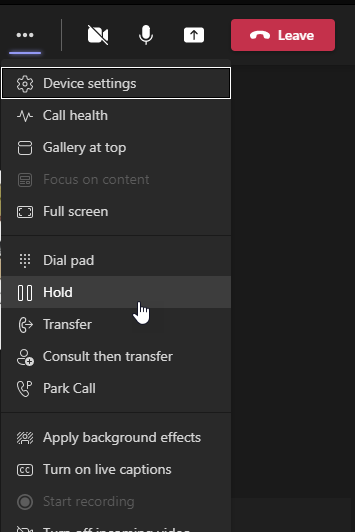
- Click the Resume button to continue speaking with the caller.
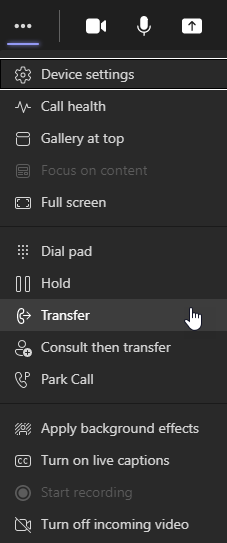
Transferring a Call
- While in the call click the Settings and more ellipsis (three dots). Then, in the drop-down menu, click the Transfer button.
- In the next dialog box, invite someone by typing their last name or their phone number. Select the correct entry and click Transfer.
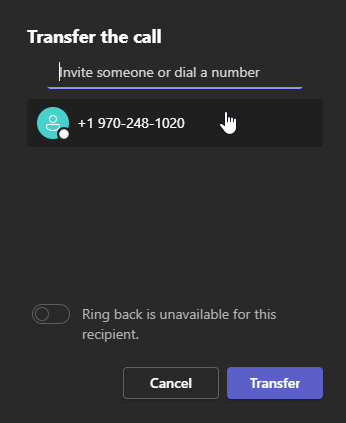
- The Call window will show a status of Transferring, and then the Call window will close.
Consult Before Transferring a Call
To speak to the person who will receive a transferred call before actually making the transfer, perform the following steps.
- While in the call, click the Settings and more ellipsis (three dots). In the drop-down menu, click the Consult then transfer button.
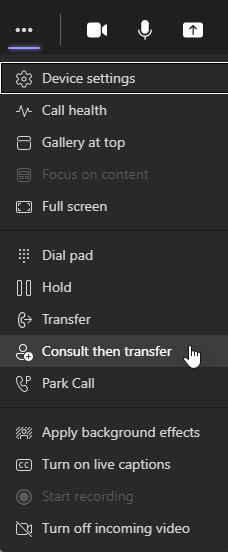
- In the next dialog, invite the person to consult with. Select their name/number. You can either Chat with them about the call to be transferred, or you can Teams audio call them.

- Once ready to transfer the call, at the top of the Call window click the Transfer button.

- The call will transfer and the Call window will close.
PaperCut has been installed as the new printing system for campus. Now, faculty and staff will be able to install printers, they need to use in their work, without a call to the Help Desk. The steps below detail how to install a printer on your CMU computer.
Installing Printers to Campus Computers
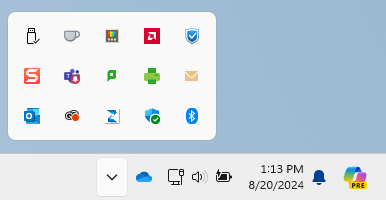
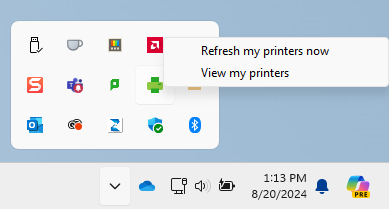
- Right-click the Print Deploy icon from the System Tray (Windows) or the Menu Bar (macOS) and in the menu, click View My Printers.
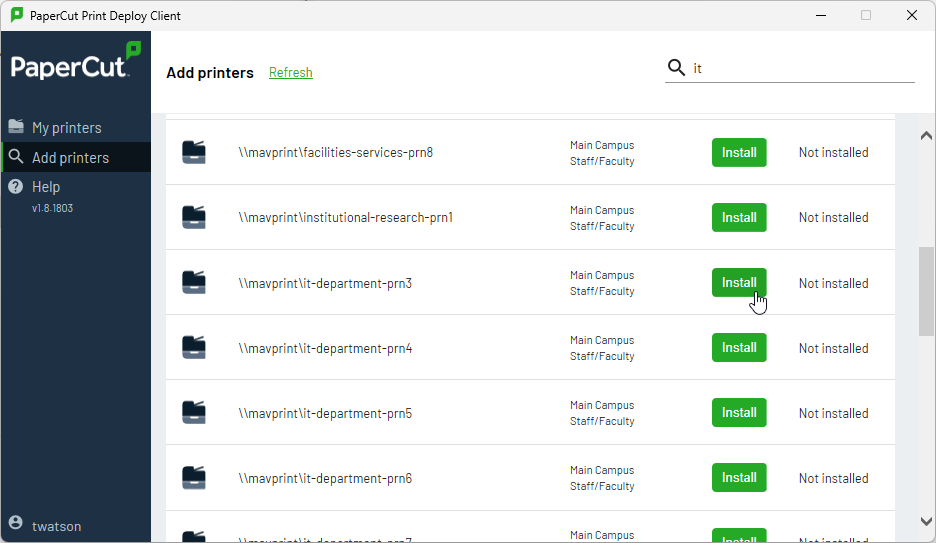
- The PaperCut Print Deploy Client dialog box will appear showing your currently installed devices. Click Add printers to show a list of printers that can be added to your computer. There's a search box if you know the printer name, or even just a part of the name. Once you locate the printer, click Install.
- After the printer is installed, print to it as you would normally through whichever application you want to print from.
- If you cannot locate the printer you want to install, then you'll need to reach out to the Help Desk.
Installing Printers to Personal Devices
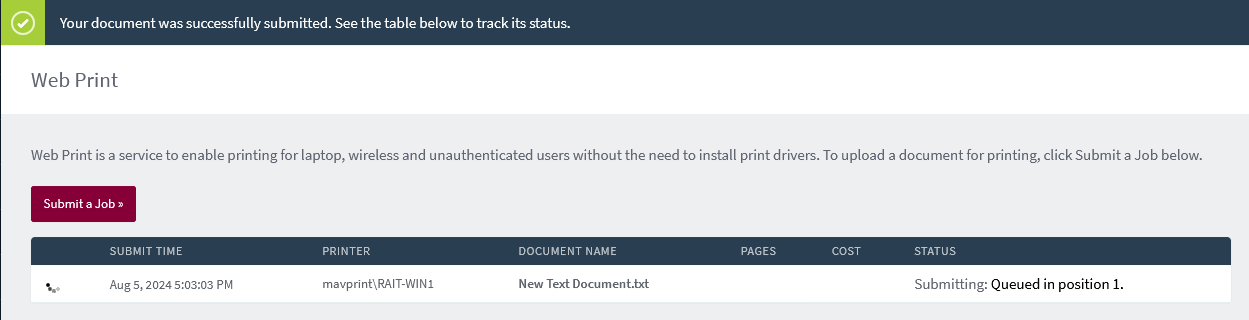
WebPrint
For printing from personal devices , WebPrint is a simple and easy way to print an existing file.
- On your personal device, login to MAVzone, and run the MAVprint app. This will bring you to the MAVprint Login screen.
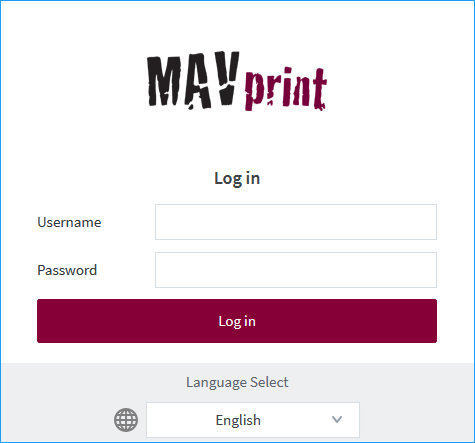
- Enter your CMU credentials and click Log in. The MAVprint window will appear.

- To print, click Web Print.
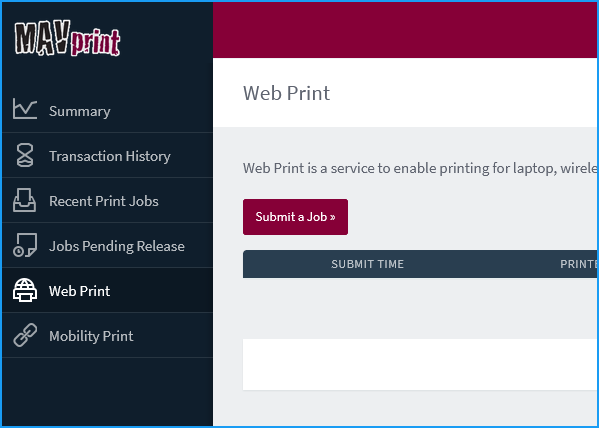
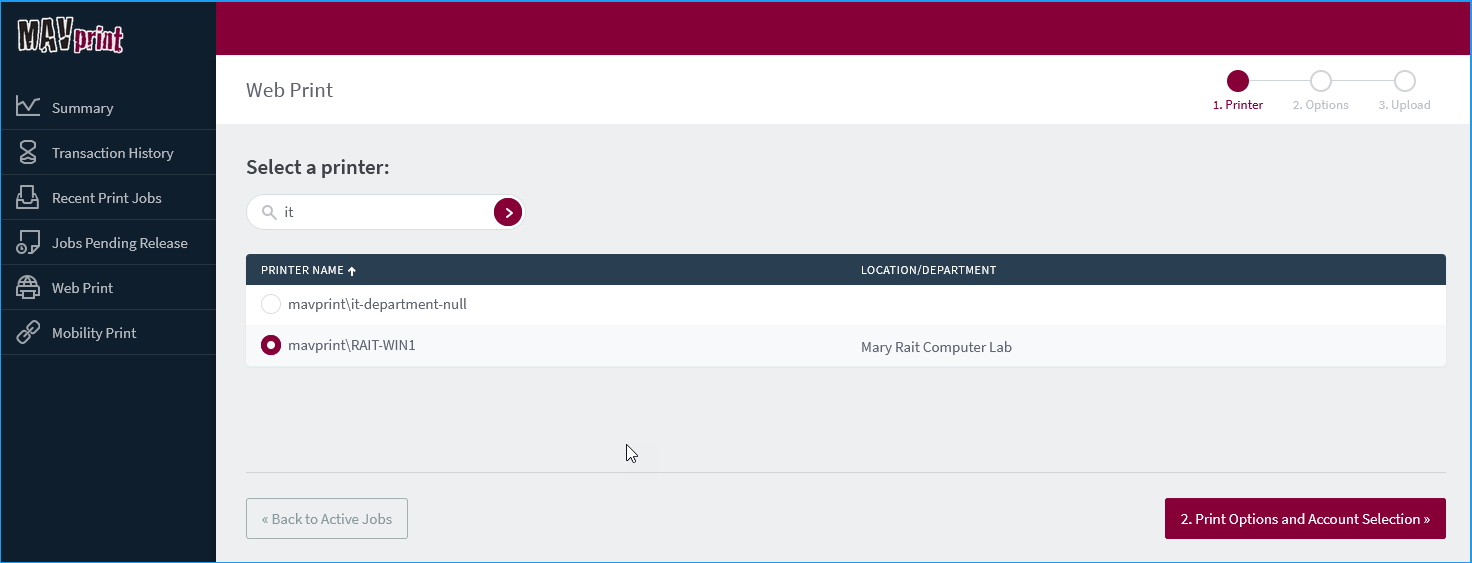
- Click Submit a Job. Next, select a printer from the list, and then click Print Options and Account Selection.
- The next screen will prompt you to upload your file. Click Upload Documents.
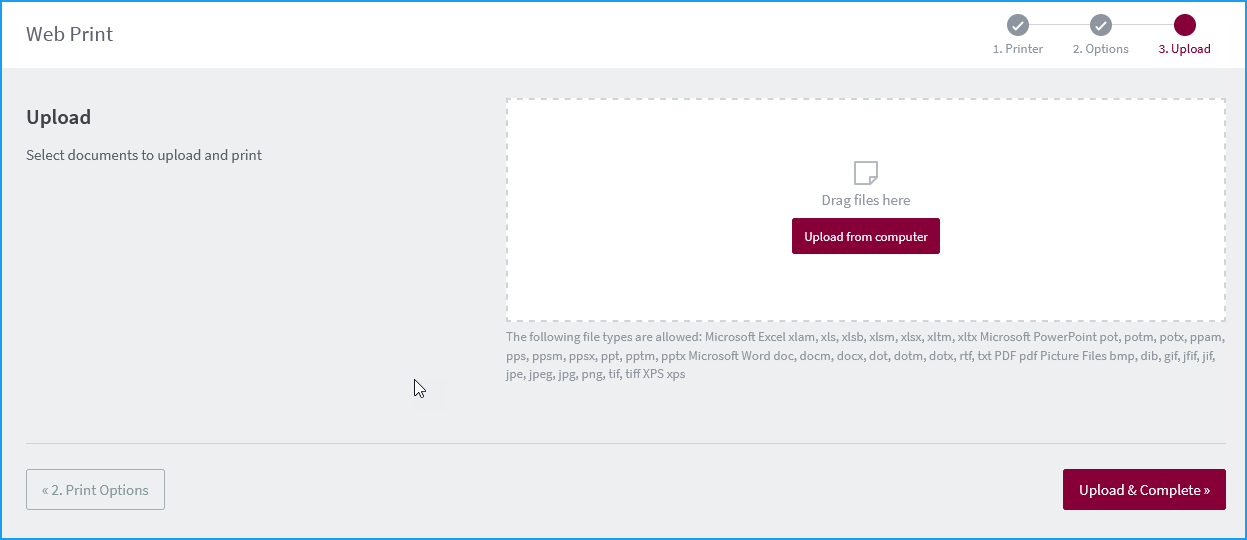
- After you've dragged the file(s) into the window that you wish to print, click Upload and Complete. The print job will take a small amount of time to render and will be submitted to the printer.
Information Technology supports smart classroom technology. General purpose classrooms and computer labs are supplied with the following devices:
- Lectern computer
- Document camera for projecting hard-copy materials
- Blu-ray/DVD combination player
- Cable cubby for connecting laptops and other compatible display devices via HDMI, USB-C, or VGA
- Wireless display for compatible laptops, iOS devices, and Android devices
Classrooms have Crestron touch panels for turning the display system on or off, source device selection, and audio controls. The following information provides detailed instructions on operating smart classroom equipment.
Additional help may be requested by calling the Technology Help Desk at 970.248.2111.
Touch Panel Operating Instructions
Additional help may be requested by calling the IT Help Desk at 970.248.2111.